Google Analytics Event Tracking Tutorial
Event tracking in Google Analytics allows you to record how visitors interact with your website.
That means that you can see exactly what content your visitors are interacting with (i.e. downloading, clicking, viewing), what pages they do and don’t interact with, and what level of leads and revenue these events are bringing to your website.
Therefore, event tracking helps you decide where you need to focus your attention on and exactly where your money making calls to action are!
In order to have an accurate view of how your website is performing, it’s crucial to set up event tracking correctly.
Read on to learn how to track events in Google Analytics.
Google Analytics Event Tracking Examples:
To start with, we’re going to break down some examples of website events that you can track. Whether you’re an omnichannel retailer or a lead-generation business, there are a number of website events that you can track in order to get a better insight into how visitors (aka. users) are interacting with your site.
Events in Google Analytics can be classified in two categories: interaction hits and non-interaction hits.
Interaction hits include anything that requires a user to act. For example, clicking a phone number, downloading a brochure, or any action of significant importance to your website.
Interaction Event Examples:
- Phone clicks
- Email clicks
- Form completions
- Newsletter sign-ups
- Store finder usage
- Map clicks
A non-interaction hit is anything on your website that is considered an important action, but doesn’t require a direct action from your visitor. Non-interaction hits could include embedded video views or page scroll depth.
Non-Interaction Event Examples:
- Embedded video views
- Page scroll depth
How to Track Events in Google Analytics:
Now let’s get into the meaty section of our event tracking tutorial.
Let’s say you want to track every time a website visitor clicks a phone number on your website and calls your business.
First things first, make sure you have Google Analytics installed. Then read this step by step guide on how to set up an event. You’ll well and truly be on your way to becoming an event tracking guru!
Step 1: Install Google Tag Manager
Start by heading over to Google Tag Manager and sign in using the same email that your Google Analytics account is registered to (not completely necessary but will make it easier to keep track of accounts).
Click Create Account.

Once you have clicked Create Account, fill out all of the information as detailed in the screenshot below. Then click create and accept the Terms and Conditions.

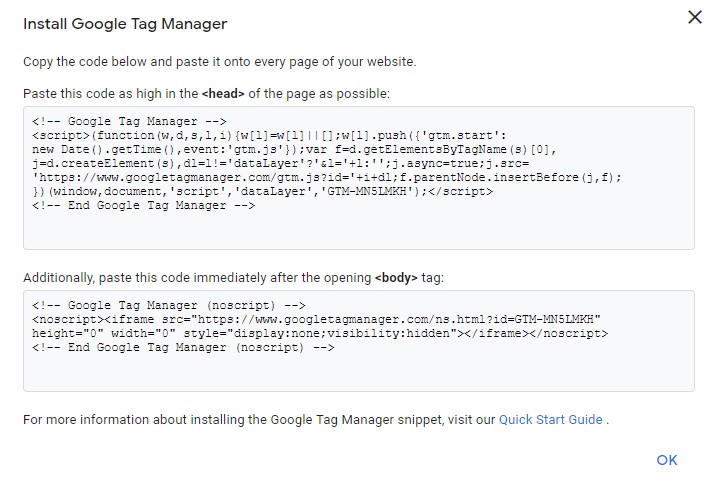
You’ll then be asked to install code snippets within the head and body tags.
To do this (if your website is a WordPress site), navigate to Appearance>>Theme Editor>>header.php within your CMS.
Copy and paste your code snippets as per the instructions in the screenshot below.

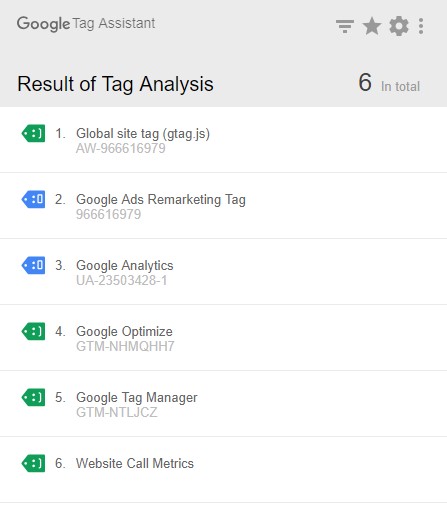
TIP: Install the Google Tag Assistant Chrome Extension. This will show you if your tracking tags, Google Tag Manager, and Google Analytics are installed and working correctly.

Step 2: Create Your Event Tag
Ok, so now that you’ve got Google Tag Manager installed you can create your first event. Start by clicking New in the top right corner.

Start by naming your event something clear and concise. For this tutorial example, we will call our event ‘Phone Clicks’.
Then click Tag configuration and select Google Analytics – Universal Analytics as your tag type.
Select your track type as Event, and then you will see four Event Tracking Parameters: Category, Action, Label, and Value.
- Category: A category is essentially the top level group of events. You can have more than one type of event being tracked within the same category. Therefore, in this example, we will call our category ‘Phone Clicks’.
- Action: An action is a specific interaction that is required for the event to be tracked successfully. As we are tracking phone clicks in this example, let’s set the action to ‘Click’.
- Label: This parameter is optional and allows you to provide more information about what action is taken. We recommend leaving this section blank for this scenario, as it can often cause event tracking issues.
- Value: This parameter is also optional and allows us to associate a numerical value to an event. Again, you can leave this parameter blank as it is not necessary for this example.
As our Phone Click event requires users to interact, we will select False within the Non-Interaction Hit dropdown.
Then within Google Analytics Setting, click Select New Variable. You’ll then be prompted to create a new variable.
Call the variable Google Analytics Tracking and within the Tracking ID parameter enter your unique Google Analytics Tracking code.
To find that, head over to Google Analytics, and from there click Admin>>Tracking Info>>Tracking Code and copy the tracking ID which should be in the format of UA-12345678-1.
Now, head back to Google Tag Manager and paste the code you just copied within the Tracking ID field. Click save.
Your tag should look something like the screenshot below. Congratulations on making it this far!

Step 3: Create Your Event Trigger
Now that you have your event tag, you need to create your trigger. This is the action that the website visitor must take to fire the event tag you have just created.
Triggers are used to pick exactly where and when you want an event to be recorded.
In our example, we want the event we just created to be triggered or ‘fired’ whenever someone clicks a phone number on our website.
Start by clicking Triggering below the tag you just created and then click the + symbol in the top right corner.

Name your trigger something like ‘Phone Click Trigger’ and then select All Elements as your trigger type.
As we only want this event to fire on certain clicks, select Some Clicks.
Then from there, you can select from a range of custom and in-built variables to create a custom rule. Essentially, we’re telling Google Analytics that when this is met, fire the event.
For our example, we want to select Click URL in field 1, contains within field 2, and tel: in field 3.
All phone links on any website will start with tel:, so the event will fire any time someone clicks a phone number.
Click save and now your trigger is complete.

Step 4: Test Your Event
Hold tight, now we get to see the magic happen! The final step is to preview your newly created event on your website.
Click preview (located in the top right corner of your screen), then head to your website. You should see the Google Tag Manager Preview at the bottom of your screen with no tags currently fired.
Click on a phone number on your website and you should see your new Phone Clicks event fire!

Head back to Google Tag Manager, click Submit and now your event should be officially tracking. Congratulations!
Is your Google event tracking not working?
Here is a list of common event tracking issues we come across and our quick fixes if your event is not firing.
- Check labels: If these are not left blank, Analytics often has trouble attributing the label correctly. This often results in the event not firing.
- Check your Google Analytics Variable: If you entered your Google Analytics tracking code into the Tracking ID section, rather than the Google Analytics Settings drop down when creating your event, this can break your tracking.
- IP Exclusions: You won’t be able to fire your event if you are testing your event in Google Analytic’s Real Time tool and you have excluded your own IP in order to not skew the results. Use your mobile’s 4G or a different internet connection to test events.
- Non-Interaction vs Interaction: When creating your event, double check that you’ve selected the right type of interaction. Does it require the user to actually click or interact with the site? That means that you should have entered ‘False’ into the Non-Interaction Hit field.
- In-Built Variables: Sometimes you’ll find that for whatever reason, the inbuilt variable you have selected (Click URL, Page URL, etc) isn’t working, even though you’re 100% confident that you’ve entered the right information into each field. Try using different combinations, for example, Starts With, or Ends With, rather than Contains. The URL that you’re inputting into the field might have some parameters that you have forgotten about. Therefore, it’s always paramount that you test your event in the preview mode on more than just one page to see if it truly works site-wide.
You are now a Google Analytics Event Tracking Wizard!
Now that you have mastered events, learn how to set up goals in Google Analytics.
Still unsure if your Google Analytics or Tag Manager account is set up correctly? Get in touch with our Digital Experience team for a free audit and consultation!